How Beautiful

So today, I’m going to brag a little.  My hubby is amazing! Vince has a true gift! His magic hands have created the most beautiful pieces of furniture. One-of-a-kind pieces for a select client base.

Here are some projects that he has completed over the past year. 

His next project is our kitchen reno. I’m so exited!!! I could just explode! Stay tuned for updates :).

Dream Kitchen

I have found my dream kitchen! I am totally in love. It’s warm and inviting and oh so pretty. I could totally see Vince cooking up a storm in there.

This kitchen is perfect and every detail would suit our lifestyle. Our home is open concept and we want to remove our ceilings to expose the wooden beams. Very much like the image above. This would transform our house completely. There are some things I would change. I have my heart set on a porcelain sink and white subway tiles, but I might change my mind after seeing how colour can add so much spark to a space.

I came across this dreamy kitchen on House of Turquoise (which I love). Not only do they feature this stunning kitchen, but the whole entire house! Here is the link to this spectacular home http://houseofturquoise.com/2017/06/butter-lutz-interiors.html


Kitchen Moodboard

We’ve been dreaming of a new kitchen for so long and we are FINALLY at the planning stage. Yippeeeeeee! A kitchen is a big investment so we want to be 100% sure of our choices. It has to be perfect. A warm, inviting and functional space. We have decided on a neutral base (white and natural wood), we will introduce colour with some vibrant accessories. At the moment I am totally obsessed with blue, all shades of blue.

So, this is where we are with our moodboard:

There are still loads of decisions that need to be made and so much more planning. The ceiling needs to be removed to expose the wooden beams, insulation and panelling needs to be installed AND we need to sand and paint etc. But before this mammoth task we need to demo, a complete demo. Everything out! There is nothing we want to keep. It’s a ton of work that we want to do ourselves. We are after a high-end look on a medium budget, so we will take on as much as we can. We would like new appliances, preferably all from the same brand but this depends on price and availability. Also, we need to decide on the cabinet style, we are leaning towards a cleaner look with simple lines.

All in all I am over the moon with the progress! It means that we are one step closer to a brand new kitchen. Whoop whoop!!!! Expect loads of updates!

Snail trail

I am literally leaving a snail trail around the house! And in the process I am driving my (very patient) husband crazy. I have just received a delivery of 10 ceramic snails! Yes 10. Maybe I am going nuts, but there is a method in my madness.

Since the creation of Timothy (you can see him here), the snail I mosaiced for a friend, I’ve had so many requests from people wanting the very same thing. Who knew snails could be so popular. This puts me in a bit of a predicament, I created Timothy with love for a dear friend and I sort of wanted him to be a one-of-a-kind. But alas, it was not to be, AND how could I turn down the extra cash! Life is expensive and every penny helps. So… I ordered 10 snails. I only have standing orders for 5 but I thought I might as well order 10. Just for good measure. Just in case. Agree?

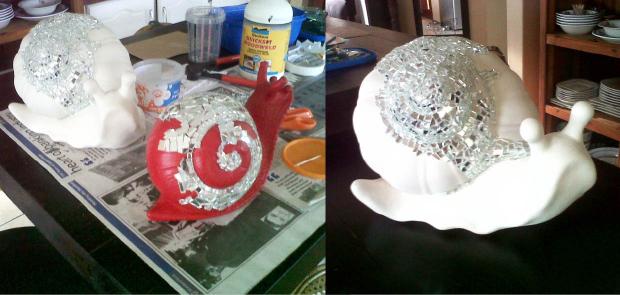
I have started mosaicing two (you may recognise Tiny Tim from this post) and I painted one silver. Vince hates my silver snail but everybody else loves it. I still might mosaic him, just gotta live with him for a while and see what’s best for him. Here he is, in the flesh :).

silver-snail

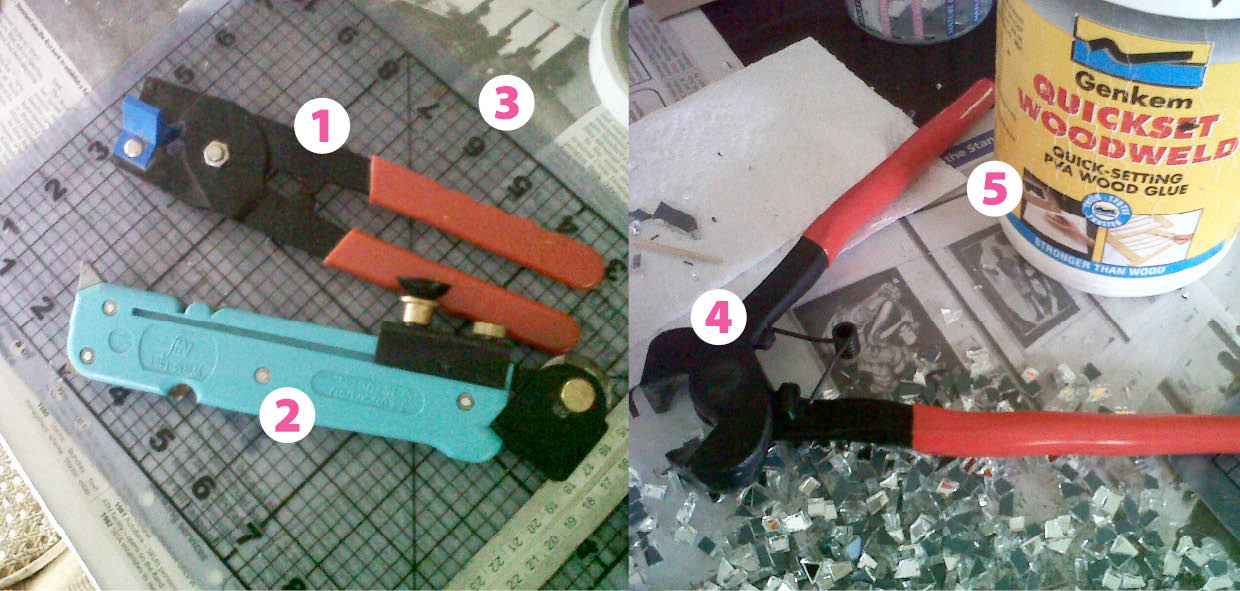
Mosaicing requires a lot of patience. It is not for the faint hearted. It takes a long time to complete a project and it’s a costly hobby. Here are a few of my favourite tools!

tools

  1. Tile snapper – snaps pieces of glass in half
  2. Glass cutter – I can cut any shape out of glass with this amazing tool. Expensive but worth every penny!
  3. Rubber cutting mat – to protect the tools and surfaces around my home (like the kitchen coutertops – eeck!)
  4. Tile nipper – nips off little edges when a piece of glass just won’t fit
  5. Genkem Wood glue – I use different glue for different projects for this project I opted for trusty old wood glue. Dries quicky and sticks fast!

There are some other tools that I would like to have but that will come in time. For now I am happy with what I’ve got.

This is what the snails are looking like at the moment. The large white one (I shall call him Vanilla Ice) is from my new shipment of snails and Tiny Tim is one that I already had, he just needed a bit of bling 🙂 (yes, I will probably name ALL of the snails).

two snails

Vince is lucky I’m only busy with two, if I had the space I would have all ten prepped and ready for action. I’m one of those people! Yep, the kind that have a million projects going at once. My house is chaos 90% of the time! One day I will have a beautiful craft room with loads of space for EVERYTHING! Oh what a dream. Sigh…

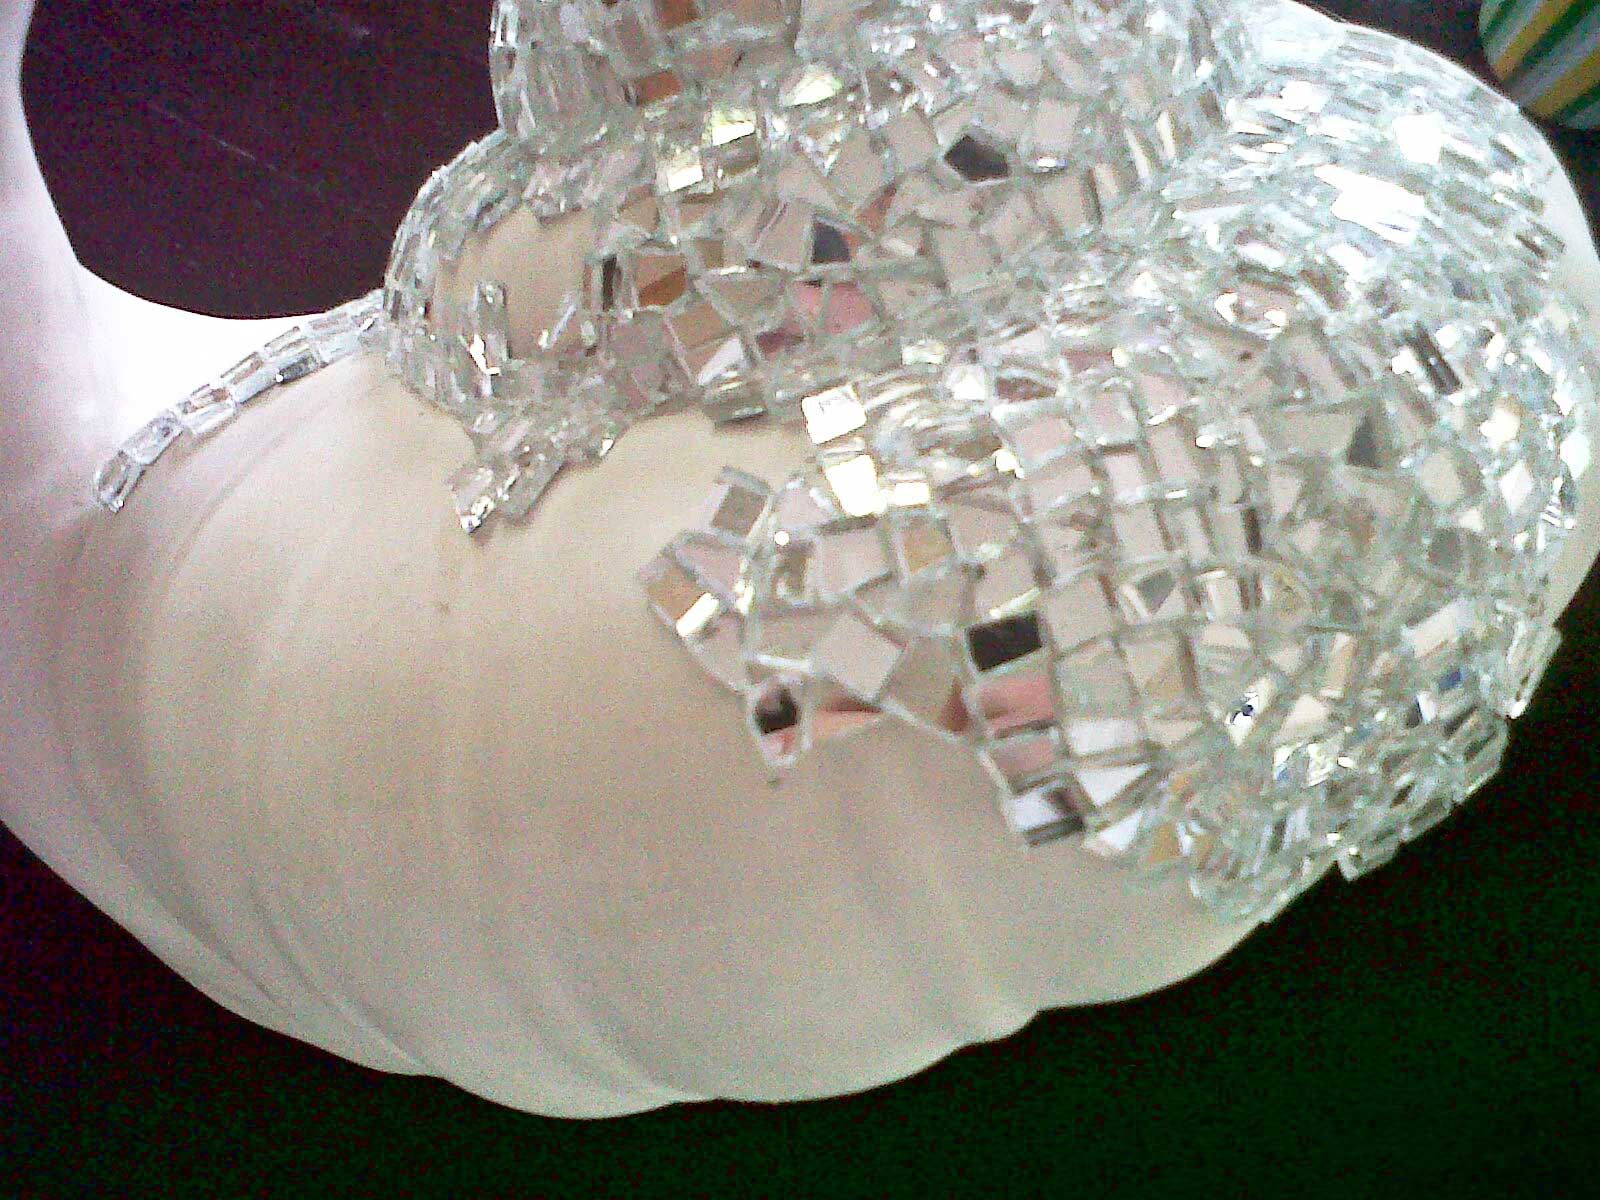
Here is a close up, so you can get an idea of how small those pieces of glass are. Teeny I tell you, and it’s taking me forever!

close-up

I will post pics of these two babies when they are finally complete. They are going to look amazing. AMAZING! (even if I say so myself #nothinglikealittlebitofselfpromotion).

Gifts DIY style

Do you feel like the holidays just whizzed by? Well, I can’t believe I’m back at work and back in the rat race once again. Sigh… oh to be on holiday forever… ANYWAY! back to reality. Today I would like to share a few more of my homemade gifts with you. I think they are “oh so pretty” :), my family and friends think that they are pretty awesome too, so now I get to share them with you. Here goes:

2013-01-02_1357145003

2013-01-02_1357144910

2013-01-02_1357145093

Can you believe I made these three items!? All the bits and pieces were purchased from craft shops, hardware stores and even our local supermarket. I used Instagram filters for a more realistic view of what they actually look like. The unedited photographs tend to make the wood look flat, like it has no grain and the grain is the star of the show you know. Without it there would be flat boring nothingness. So yay for grainy wood! I could create things all day long, the messier, the better. The only think I need to learn, is how to use powertools (hehe – naughty grin), then there’s no stopping me :).

From the heart

I love Christmas. It makes me feel all warm and fuzzy inside. A time for love and a season of giving. To celebrate the begining of the Christmas season, my friends and I have a little get together to exchange gifts (secret Santa style) and embrace the warmth of our friendship. I am lucky to have such special friends and I knew a gift from the heart was in order. So I got creative and made a beautiful gift for my friend Jax. She loved it! This is how it turned out.

20121214_071425

I have a few more handmaid gift ideas and will give you a step by step guide on how to make a gift from the heart, so stay tuned over the next couple of weeks.

Lucky number 12

So my mosaicing is becoming a real little money-maker! Ok, so I won’t be quiting my job anytime soon, but it does bring in some extra cash (chaching!). The most recent mosaic order was for a house number, the number 12. This means double trouble! Two numbers instead of one, eeeeck. AND to be done in only one week. Whew, time to get down to business.

As usual, Vince was roped in, I needed somebody to cut numbers out of wood (jigsaw+me = not friends). So after the tracing, the cutting, the drilling and the painting, I could get started on the glueing. This is a pic of the number in progress, I had just started glueing the pieces of cut mirror onto the wooden number.

Pic-01

It does take a while to get the momentum going, but once it’s going, you just can’t stop me. I become obsessed! Waking up at 5am in the morning to mosaic before I go to work is like the best. thing. EVER. Totally obsessed! Sometimes I drive Vince crazy, but I just can’t help myself. Here is a pic of the finished product all glued and grouted and polished. See than shine? Nothing like good ol’ elbow grease.

Pic-04

My client was soooooo happy and even placed an order for a mosaiced mirror. Yay for happy clients and more orders! I must be doing something right. 🙂

Home sweet home

I love my home. Its a fact! It might be small and need LOADS of work, but I love it. I needed something to let my home know how much we are in love with it (yes houses have feelings, and so do cars, and teddy bears). I wanted my home to know that although we do want to make changes, that it will always be my “home sweet home” forever and always.

I scrounged a piece of wood off the scrap wood pile and worked some crafty magic on that sucker. It went from zero to hero :). Here is a picture of my crafty work-of-art. So proud.

I still need to find the perfect spot for it. I had Vince hold it up in several locations around the house but I couldn’t quite decide. Eventually he got tired of holding it.

Look out for a post on my next big project. Eeeeck, I don’t know what I’ve gotten myself into…

Lookie what I made

Scrap wood + handcut stencil + a few hooks = one fine keyholder

Vince’s garage is full of interesting stuff and when I feel the creative bug bite, that is my one-stop-shop for finding something I can get my DIY hands on. While mulling around the garage, seeing what I could see (no touching!), I found a piece of scrap wood roughly the size of an A4 page. It was too small to do anything with but it seemed like such a waste to throw it out. I asked Vince to router the edges and sand it so it was nice and smooth. Mmmmmm, I love wood! Wood is beautiful! This little piece of wood has amazing knots. It was destined to be something beautiful.

After white-washing my little piece of wood, I then measured for the placement of three hooks and marked where each one should go. I then drew up a stencil with words on my computer and printed it out onto normal paper. I then cut a stencil from the print-out, this was very time consuming but so worth it in the end. Now, the tricky part, placing the stencil onto the wood. I had to make sure the wording was straight, I’m not one for skewness (if there is such a word). Once my stencil was in place, I used a sponge and gently sponged silver paint onto the wood. I let the paint dry for a few days and then gave it a VERY light sanding to give it a more rustic look. I also varnished it before placing the hooks, but I won’t do that again, it makes it look a bit unnatural and I was going for natural and rustic, so boo for the varnishing. All painting, sanding and varnishing done, and now for the hooks. I used the kind that screw into place but my weakling arms couldn’t manage them so Vince came to the rescue and voila, they were in.

Here is a pic of the finished product 🙂

I’m thinking of making some more items. I’ve got a lot going on in this brain of mine. I’m also busy designing a logo for Vince’s furniture and decor business. Will give you a sneak peak soon. xxx

A slimy affair

I have a new love! Two in fact… Meet Timothy and Tiny Tim…

Where those names come from, I have no idea. They just seem right. I bought these two beautiful creatures at the local craft shop. I was looking for a gift for a close friend, then I spotted these babies. I just had to have them!!! No questions asked. I didn’t even look at the price. I scooped them up, one underneath each arm, and away we went. They were plain white, so I mosaiced one and painted the other one red. Don’t they look oh-so-handsome. Tiny Tim is half the size of Timothy, hence the name Tiny Tim. Aaaaaah, they make me so happy. It’s the small things in life…

Sadly Timothy has gone to live with my good friend Helen (she’s taking good care of him) but Tiny Tim is all mine :). He sits on the windowsill in my kitchen and keeps me company. Such a good snail.